Monday, March 28, 2011

Viva Las VegasStamps Design Team

GREAT NEWS!!! I have been selected as a member of the Design Team for Viva Las VegasStamps. I am so inspired by the VLVstanps...my mind runs wild!!! You will soon see we share the same sense of humor... You can catch updates on Stampo Blog and order the stamps at Viva Las VegasStamps.


Here is my first design team contribution...an Escape Winter Party Invitation created with stamps from just released Plate 1328.

invitation to escape winter party


The card is a mixed media design personified. The design was created in Photoshop after I stamped the images on white paper and colored them. The entire image was scanned and digitized, placed on a card in PhotoShop and words were added.

Other team members are:

Terri Sproul, Team leader: Terri's blog

Chris Hurley: Chris' blog
Kim Prince; Kim's blog
Cheryl Lindsay: Cheryl's blog
DeeDee Catron: DeeDee's blog
Jennifer Bliss: Jen's blog
Please visit their blogs to see their designs and say hello. You can also find our work on Stamp Art Forum and VivaLas Blog.


Stamps used:

Card:

Plate 1328 - A wonderful selection of unmounted rubber images and sayings from the fabulous Viva Las Vegastamps! collection measuring approximately 7" x 9".

Wednesday, March 16, 2011

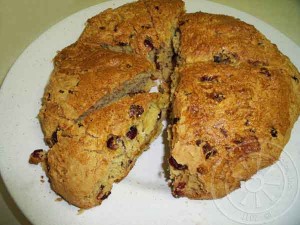
Happy St. Paddy's Day with Irish Soda Bread


click to download

I have designed a great printable for YOU!!! It is one of my Mason Jar Gift Sets. And I give you a step-by-step tutorial with photos for making Irish Soda Bread. Plus a little video to cheer you!!! Happy St. Paddy's Day!!!

You just layer the dry ingredients in a Mason Jar...print out the printable Gift Set...cut out the recipe and punch out the 2"tag...decorate your jar lid and you're all set. It is a great hostess gift for your St. Paddy's Day party throwers.

Just click the recipe card and tag printable to the left and that will start the download. Once it is downloaded to your computer, open it and print it on cardstock. Cut out the recipe and combine the dry ingredients in a Mason jar. Try to make nice layers.

HINT: Place the flour mixture on the bottom. If you place it or even part of it on top of raisins, the flour will seep down into them and cover them. See the video above and you will understand!!!

Cove the jar lid with a cute green print fabric. I used a leather showlace to tie it on. Punch out the round tag with a 2" punch. I designed the tags with a little play in case you get a little off center. Punch a hole in the top of the tag and hang it from the shoelace. You could also glue it to the front of the jar as in the picture above.

So let's make Irish Soda Bread


This is a quick and easy recipe. This is a great recipe to try for your first attempt at breadmaking...as it is almost foolproof!! The traditional recipe calls for raisins, but I often substitute semi-sweet chocolate shavings, craisins and a new fave is pomegranate craisins. So feel free to experiment.

  1. Combine dry ingredients into a bowl.

  2. Cut in butter until it is thoroughly mixed with dry ingredients.

  3. Spread mixture out on floured surface.


  4. Make a well in center of the mixture.

    ]
  5. Wisk egg and buttermilk together. Pour into the well in center of dry mixture.


  6. Mix with your hands. It s sticky.

  7. Knead for 1 minute adding small amounts of flour to make it less sticky.


  8. Shape into a nice round loaf.


  9. Place on greased baking sheet. Score the top with a cross shape with knife.

  10. Bake and enjoy!!!


Bread!!!"]

Saturday, March 12, 2011

Some Rubber Stamping Cre8Tiva Style

Here are some of the things I do with rubber stamps from Viva Las Vegas Stamps and Stampo Blog. I am so inspired by the VLV stanps...my mind runs wild!!! There is ALWAYS movement toward the edge of what's possible here...


The Believe in Magic card is a mixed media design personified. The background was painted with acrylics. The good witch's background design was created in Photoshop. The digital background was printed and then stamped, cut out and collaged to the painted background. The words were stamped and additional details were added. The entire image was scanned and digitized, placed on a card in PhotoShop and printed.

[/caption]

The above image pushes the limits of PhotoShop, rubber stamping and photography. I shot this image from a poster in the subway in New York last fall. I have used it several times in my art. This time I found a rubber stamp called Egyptian Eye and knew it had to be used for surreal effects. I stamped the image on paper with black ink. I scanned it into PhotoShop and placed it over the eye in the image. I stretched and manipulated the image somewhat!!! Then I created the digital painting.

Below are two version of the Alice and the Cheshire cat stamp:


Another surreal fantasy image of Alice in Wonderland with the cheshire cat! This time I stamped the image on white paper, scenned it into PhotoShop and placed it over one of my digital paintings of tall trees. I painted the cat to make him stand out. It is more like Alice in fantasy land!!!


The idea or the graffiti clutch purse came when I discovered this Alice stamp!!! The background of the fabric was painted with acrylics using my graffiti techniques. A white rectangular frame was painted so the stamp would appear as a book page. Then the Alice and the Cheshire cat stamp was applied and the cat background painted. I wanted Alice's friend, the cat, to stand out. The friend words stamp was applied last. The clutch purse was sewn and embellished in my signature rustic stitches.


Stamps used:

Card:

Beautiful Witch/Fairy

Believe In Magic


Egyptian Eye:

Egyptian Eye


Alice and the Cat & the Clutch Purse:

Alice & Cheshire Cat

A Friend Is A Forever Thing