Sunday, May 8, 2011

To the Beloved Women Before Me...

A Mother's Day Tribute

"When I find myself in times of trouble Mother Mary comes to me. Speaking words of wisdom, let it be, let it be." -The Beatles, Let it Be.


Let us pray for all of those who have ever undertaken the profession of motherhood and all the women who have come before us who helped shape us into the women we are today.


This is my beautiful and spirited Mother in one of her musicals (circa 1945). She was a singer and a dancer. She loved music. She had a radio show for years. I used to listen as a baby with my beloved Grandmother Annie Niland. A tale from my childhood: When I was about three, I missed my Mother. I was precocious, to say the least. I thought if I could get her out of that radio box, she would come home. I sent Annie to the kitchen to get me some juice. While she was gone, I took the opportunity to knock the radio off the stand and break it. Annie came rushing back in and found me standing amidst the pieces of the radio. Looking up at her with wide-eyed expectancy I announced, "Mommy will come home now." She didn't come home.


Me with the said radio


Mother and I circa 1953


My beloved Grandmother Anna Rebecca Casey Niland 
(she was in a play called The Girl of the Golden West)


My Beloved Grandmother  Emma Constance Bledsoe White

My beloved Great Grandmother "Nana" Casey

My beloved Great- Great Grandmother Penrod

Today's Intention - Tell your Mother how much you love her - in person, by phone, or in a prayer lifted up to her by angels.
U Be Creative Today!

Friday, May 6, 2011

Mother's Day Cards with Digital Design Elements

These cards were created with three of the beautiful women's face stamps from Viva Las VegaStamps. VLVS has over 75 images of women's faces available to you.


Being a digital mixed media artist, I love to combine traditional elements with digital. For this set of cards, I wanted to show stampers how easily it is to use the stamped images with digital elements. I also wanted to create three different cards using the same few design elements. It is important to note that you must respect the stamp manufacturer's copyright policies when creating anything.

I stamped each image on white paper and scanned them into PhotoShop. I created the card background elements in PhotoShop. The faces were colored and decorated digitally also.


Viva Las VegaStamps Used in these cards:
Lady In Big Red Hat 2 x 2 1/4
Item 2495 Plate 729 Ladies Woman Women Page 489

Lady In Chapeau 1 1/2 x 1 1/4
Item 5796 Plate 595 Ladies Woman Women Hat Hats Page 328

Lady Round Hat/Large 3 1/2 x 5
Item 7564 Plate 252 Ladies Woman Women Page 14

Sunday, April 24, 2011

Easter Blessings


i am unplugged for the weekend to put my faith into action by serving Him and others...i wish each of you a blessed and meaningful Holy weekend...

all artwork is by Rebecca E. Parsons...


Friday, April 22, 2011

VLVS Design Team Artwork

vintage art with VLV stamp and old magazine ad


VLVS stamp 12509

This is my second design for Viva Las VegaStamps Design Team. When I first saw this stamp, I had about 10 caption ideas. I love working with VLVS stamps because they have the same sense of humor as I do and loads of vintage images.

The above artwork is just one of those many ideas.
Here's the backstory: The wife is getting ready for her first party after her marriage. She is in her brand new kitchen, but doesn't have a clue how to cook!!! She has burnt everything and her new husband walks in...all she could think was, "Honest, I didn't burn the beer!!!"

This is a digital collage. I love digital collage because I can use the artwork as a card, party invitation or even a work of art. I scanned the stamped image, colorized it and created the collage in PhotoShop. Here she is colorized:
For a step-by-step tutorial with photos visit my blog: Cre8Tive Compass Magazine.

Please visit Viva Las Vegastamps! and see the thousands of designs available. Also visit the other VLV Design Team members and tell them I sent you!

Terri Sproul, Team leader: Terri's blog
Chris Hurley: Chris' blog
Kim Prince; Kim's blog
Cheryl Lindsay: Cheryl's blog
DeeDee Catron: DeeDee's blog
Jennifer Bliss: Jen's blogYou can also find our work on Stamp Art Forum.

You can find more of my work at:

Thursday, April 7, 2011

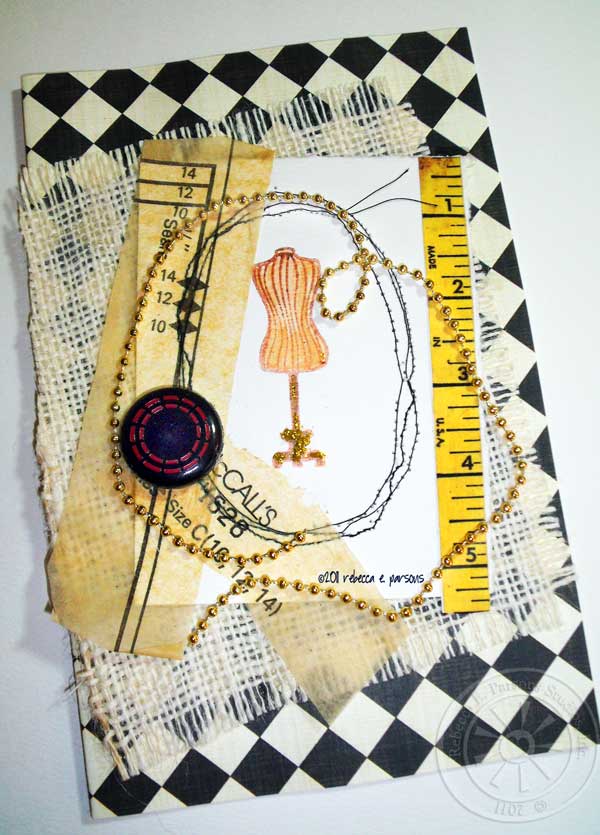
Frameable Dressmaker Collage and Card

"Dressmaker Dressmaker Make Me a Dream..."

I am Rebecca E. Parsons and this is my first design for Viva Las Vegastamps! I am honored to be on their new design team.

I love dress forms and this VLV stamp (6388) inspired me to create an artwork that honors the time worn tradition of dressmaking. I design all my cards to be frameable pieces of art for the reciepent. They just need to insert this in a 8X10" frame and hang it to enjoy forever.

The artwork is titled: "Dressmaker Dressmaker Make Me a Dream..." It is in honor of my grandmother Annie Niland who taught me how to sew on a Singer tredle sewing machine when I was just a young girl. She had an old dress form in the corner of the sewing room and the bits and pieces in this collage are all reminicient of that time I spent with her.

Here is how I created this:

I stamped the image on a piece of heavy watercolor paper (120 pound) with BRILLIANCE Cosmic Copper pigment ink by Tsuneko. I folded the paper and wet the edges so it would tear easily.


I then tore the paper along the fold line.


I did free-motion stitching with black thread and my sewing machine in an oval shape around the image. This was very random allowing the stitches to show and create texture and depth.


Then I began to collage bits and pieces to accent the image and the theme of dressmaking. I used old pattern tissue, an antique button, an old tape measure, etc. When I was pleased with the arrangement, I glued the pieces down and sewed around them again to secure the tissue. I removed the shank from the button and hot glued it in place.


I then went to work on the background. I had this Vintage Black Harlequin cardstock (no longer available) from The Paper Studio in my stash. It was perfect. I cut and frayed the edges of some cream colored burlap and glued it on the front of the cardstock at an angle.


Next I painted the dress form with Copic markers to add shape and dimension. I used YR04 and YR16. I then glued the artwork to the background. I felt it needed a little bling so I added glitter glue in gold to the base of the form and wrapped some gold pearls around the image and glued them with dots of hot glue. Here is a close up of the art:

Please visit Viva Las Vegastamps! and see the thousands of designs available. Also visit the other VLV Design Team members and tell them I sent you!


Terri Sproul, Team leader:
Terri's blog
Chris Hurley: Chris' blog
Kim Prince; Kim's blog
Cheryl Lindsay: Cheryl's blog
DeeDee Catron: DeeDee's blog
Jennifer Bliss: Jen's blogYou can also find our work on Stamp Art Forum.

You can find more of my work at:

Monday, March 28, 2011

Viva Las VegasStamps Design Team

GREAT NEWS!!! I have been selected as a member of the Design Team for Viva Las VegasStamps. I am so inspired by the VLVstanps...my mind runs wild!!! You will soon see we share the same sense of humor... You can catch updates on Stampo Blog and order the stamps at Viva Las VegasStamps.


Here is my first design team contribution...an Escape Winter Party Invitation created with stamps from just released Plate 1328.

invitation to escape winter party


The card is a mixed media design personified. The design was created in Photoshop after I stamped the images on white paper and colored them. The entire image was scanned and digitized, placed on a card in PhotoShop and words were added.

Other team members are:

Terri Sproul, Team leader: Terri's blog

Chris Hurley: Chris' blog
Kim Prince; Kim's blog
Cheryl Lindsay: Cheryl's blog
DeeDee Catron: DeeDee's blog
Jennifer Bliss: Jen's blog
Please visit their blogs to see their designs and say hello. You can also find our work on Stamp Art Forum and VivaLas Blog.


Stamps used:

Card:

Plate 1328 - A wonderful selection of unmounted rubber images and sayings from the fabulous Viva Las Vegastamps! collection measuring approximately 7" x 9".

Wednesday, March 16, 2011

Happy St. Paddy's Day with Irish Soda Bread


click to download

I have designed a great printable for YOU!!! It is one of my Mason Jar Gift Sets. And I give you a step-by-step tutorial with photos for making Irish Soda Bread. Plus a little video to cheer you!!! Happy St. Paddy's Day!!!

You just layer the dry ingredients in a Mason Jar...print out the printable Gift Set...cut out the recipe and punch out the 2"tag...decorate your jar lid and you're all set. It is a great hostess gift for your St. Paddy's Day party throwers.

Just click the recipe card and tag printable to the left and that will start the download. Once it is downloaded to your computer, open it and print it on cardstock. Cut out the recipe and combine the dry ingredients in a Mason jar. Try to make nice layers.

HINT: Place the flour mixture on the bottom. If you place it or even part of it on top of raisins, the flour will seep down into them and cover them. See the video above and you will understand!!!

Cove the jar lid with a cute green print fabric. I used a leather showlace to tie it on. Punch out the round tag with a 2" punch. I designed the tags with a little play in case you get a little off center. Punch a hole in the top of the tag and hang it from the shoelace. You could also glue it to the front of the jar as in the picture above.

So let's make Irish Soda Bread


This is a quick and easy recipe. This is a great recipe to try for your first attempt at breadmaking...as it is almost foolproof!! The traditional recipe calls for raisins, but I often substitute semi-sweet chocolate shavings, craisins and a new fave is pomegranate craisins. So feel free to experiment.

  1. Combine dry ingredients into a bowl.

  2. Cut in butter until it is thoroughly mixed with dry ingredients.

  3. Spread mixture out on floured surface.


  4. Make a well in center of the mixture.

    ]
  5. Wisk egg and buttermilk together. Pour into the well in center of dry mixture.


  6. Mix with your hands. It s sticky.

  7. Knead for 1 minute adding small amounts of flour to make it less sticky.


  8. Shape into a nice round loaf.


  9. Place on greased baking sheet. Score the top with a cross shape with knife.

  10. Bake and enjoy!!!


Bread!!!"]